
How to use Marko's Pizza Kits

How to make pizza at home
Marko's pizza kit comes with everything you need to make one a 12" (medium) sized pizza. Your kit will include:
- 1 dough ball (255g)
- 4oz pizza sauce
- 1oz garlic oil for the crust
1: Take care of your dough
This is a cold-proofed pizza dough, so it will be good in the fridge until Sunday, Jan 22. When you are ready to make pizza, bring the dough up to room temperature – at least 20 minutes, up to 2 hours
If you won't use it before then you can freeze it in the container it's already in. You can freeze the dough, sauce, and oil for up to 3 months. Thaw overnight in the fridge. Do not thaw on the counter, the yeast will grow unevenly.
2: Pre-heat your oven
-
Wipe down the inside of your oven with a wet cloth to remove any oil build-up. If you skip this step your house will be a smokey mess.
- Move your oven rack to the lowest point (do this while the oven is cold).
- Pre-heat your oven to its highest bake setting, at least 30–45 minutes before baking. If you have convection, use it!
Notes: You don't need to use the broiler function. If your oven is unreliable or doesn't get very hot, use the cast iron pan or 13x9 pan method below.
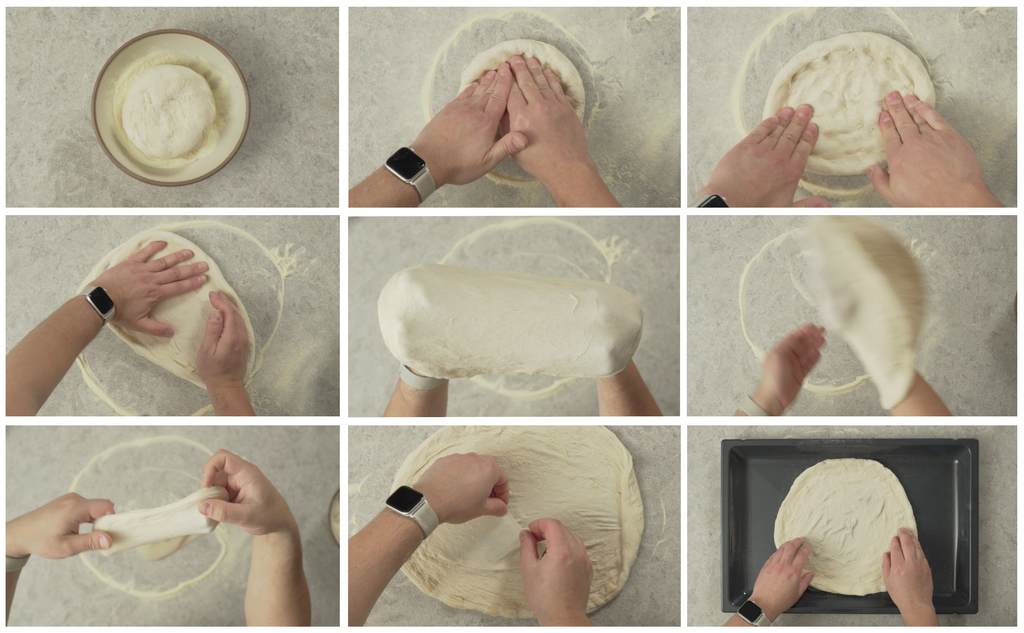
3: Shape your pizza

- Toss the dough in flour (semolina flour is ideal) and then dust your counter with flour
- Place the dough on a well-floured countertop and create a rough outline of your crust. Press your fingers into the dough, rotate the dough, and continue around the full pizza. If the dough sticks to the counter, add more flour.
- Press down in the center of the dough to flatten it out.
- Use your dominant hand to hold the crust in a C-shape, and use your other hand in a fanning motion to gently stretch the dough. Rotate the dough after each stretch. If the dough sticks to the counter, add more flour.
- You can stretch the dough by using two fists to pull it. Your fists provides more surface area, using your fingers could rip the dough.
- If you’re feeling ambitious you can slap the dough, with your hands like ping-pong paddles.
- The easiest way is to hold the dough by the crust and let gravity pull it down. Keep rotating the pizza.
- If you end up with a hole in the dough that’s totally fine. Dip your finger in water, tap both sides of the hole, then fold the dough over to close the hole.
- Move the pizza dough to a baking sheet – use aluminum, stainless, or carbon steel.
4: Assembly your pizza

- Sauce your pizza – add a little bit at a time and move it around with the back of a spoon in a circular motion. You can always add more, you can’t take it away.
- Visualize your pizza as finished slices – you want to keep the toppings closer to the crust, not the middle
- Start by going around the outside of the pizza.
- Leave space between your toppings.
- You can put cheese over top of the sauce, or on top of the toppings. My favourite method is to put cubes of cheese on at the end.
5: Bake your pizza

- Place the pizza in the oven and bake for 12–14 minutes until the crust is brown. You can peak underneath to see if the bottom needs more time.
- Remove from the oven and brush the crust with garlic oil. If you don’t have a pastry brush you can spoon it on, or use it as dipping sauce.
- Move to a cutting board to slice. If you don’t have a pizza wheel use scissors! Optionally top your pizza with chili flakes, chili oil, or hot honey.
Alternate methods
Cast iron / stainless / carbon steel pan
If your oven isn’t reliable, or doesn’t get very hot – or you just like pan pizza – your best option is to use a heavy, oven-safe pan made of cast iron, carbon steel, or stainless steel. Because you are using high heat I don’t recommend using a fossil fuel-based non-stick coating like Teflon/PFAS, which will break down in the oven.
Pan measurements are for the top of the pan, not the bottom. A 12” pan has a 10” base, so adjust your dough size to fit the base of the pan. Larger dough volumes will be thicker/fluffier and may need marginally more cooking time.
-
Pre-heat your oven as high as it goes.
-
Pre-heat your pan on medium for a few minutes, then add 2 tbsp olive oil. It should be shimmering but not smoking. I don’t recommend using butter because it will burn and become bitter.
-
Add your stretched dough into the pan – it wills start to sizzle and cook and rise quickly.
-
Working quickly, add in your sauce, cheese, and other toppings.
-
Move the pizza to your pre-heated over to finish cooking. Remove it when you see browning on the top of the crust and cooked toppings, another 5 minutes.
-
Remove it from the pan with an offset spatula, the bottom should be very crispy, deeply golden, and lightly fried.
A 13x9 pan
You will need 2 dough balls to fill a 13x9 pan.
-
Preheat the oven as high as it goes.
-
Add some olive oil to the pan and rub it around the edges (you can also use butter to make it taste like Pizza Hut).
-
To shape the dough, push it down with your fingers while pulling. Then pick up a corner and stretch slightly past the edge.
-
Assemble your pizza. A huge benefit of using a pan is that you can put cheese right into the edges of the pan for some crispy cheese moments.
-
Bake for 12-15 minutes, until the sides and top show browning.
-
Allow to cool slightly before removing from the pan.
-
Since the crust is thicker and fluffier, the garlic oil makes a great dipping sauce for the pizza in this instance.
Probably Worth Sharing
If you'd like to follow along with Marko's recipes at home, you can follow Marko in a few places:
- subscribe to Probably Worth Sharing on Substack for weekly writing on food
- subscribe to Probably Worth Sharing on YouTube for recipe videos
- follow Marko on Instagram for daily cooking on Stories
Marko recently wrote about his experience with pizza, including all of the recipes used in this kit if you want to make them at home.


